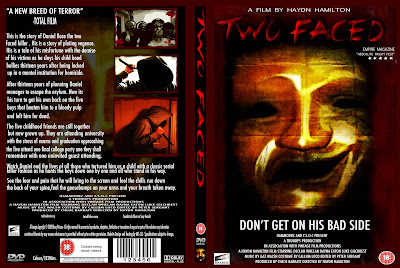
In this blog i am writing about how i made the TWO FACED dvd the time it took in order to get this right and how i did it step by step with evidence from screen shots below this text is the finished project.
To start off this project i had to find the correct dimensions to make a DVD sleeve to this i measured a DVD case to find the dimensions and then used a website to get the template for the DVD sleeve the DVD sleeve website is linked below this text.
With the DVD sleeve template
As show below the correct dimensions for a DVD sleeves is 273mm by 183mm.
Once the dimensions were met it was then time to make a start on the DVD sleeve its self in order to do this i needed to put this template into photoshop simply opening the PDF template and inserting into photoshop was all that was need at this point shown below is the template in photoshop.
Once the template was in photoshop i used the pain bucket tool to fill in the template to make the page white in order to make the template more visible.
when the template was added i cropped the image so only the borders for the template were shown not the out line dimensions.
when this step was done i put the poster that i made previously in the box on the right so it fits to scale with the page.
Once the picture was in the correct position with the correct scale the white borders surrounding it i made them the same colour as the border surrounding the mask to make it blend in a mix in with feel of the movie genre.
As shown above the border ties in with the effect but also makes it obvious that there is still a border there once the dvd sleeve border was finished i then made the white areas back so it ties in with the theme of the original film poster which has a black background to do this i revisited the pain bucket tool and then filled in the areas.
with the areas all filled in was time to turned my attention to the centre of the dvd sleeve.
The spine to do the sleeve i got the original image of the Two face poster on another page and then cropped it so it is visible on the spine.
as shown from the screenshots above the mask is cropped in the spine and fits perfectly once this was finished i moved on to the two face movie text to be located down the spine.
To do this i selected the type tool selected the film font which is called "Crimes Times Six"
below is a screen shot of the text in its default colour.
when the correct text was selected i changed the colour of it to red and then used the edit option to rotate it and scale it to fit down the spine show below is a screenshot of the text on the DVD spine.
All that was left to do on the spine was to have the BBFC 18 rating on the spine and the official DVD symbol to make it realistic and genuine.
i found the digital images on the internet and dragged and dropped them in as they were a PNG format.
Now that the DVD spine was finished it was time to move on to the back of the DVD sleeve.
To start the dvd sleeve off i put a blurb on the back.
To do this i used multiple text layers on the back of the DVD sleeve and then wrote a short summary of the movie with the text layers also with the copy right laws and the duration of the film. with a review from a movie magazine on the top above the blurb.
below shows a group of screen shots showing close up of the different areas of the text.
once all text was put on to the back of the DVD sleeve i had to make this look more real so i added five images two i had previously used these were the BBFC rating the other was the DVD official logo. the other three were a barcode,dolby digital and the sony pictures logo which i previously used on the poster. below are two screenshots of the new images on the back of the sleeve close up and one normal size.
The final thing to add to this DVD sleeve is three images or scenes from the movie on the back simply the original images i had were previously edited and were then put on the back however i put red bloody borders simlar to that of the poster round the scenes to make it seem more appealing to the eye.
i used the previous border i had from the poster and proceeded to put the border around the images i then moved the images to positions one above another until it looked real.
However i felt that it was missing something as the genre I'm going for the horror side of DVD sleeves never have a blank back so i used the mask again but turned the opacity down and hid the mask behind the text.
Below are screenshots of just the scenes and later the mask and below again is the finished product.

So this is my final product i hope this was informative for you and i would like to thank you for taking you time to view this blog.


No comments:
Post a Comment